

Linux can get you some professional features like a mail server or web server for websites as well as word press or forums for free. In this guide I will attempt to simplify making your own linux web server with all the goodies you would want.
We will use Vi as our editor and we will want to update it first before anything and make sure SSH is installed.
apt-get install vim-nox
apt-get install ssh openssh-server
My favorite linux distro for servers is Debian. If you can get a SSH connection directly to the command prompt through either putty or VPN this is the best way.
From the command prompt # with root access.
First thing you need to do is make sure that debian is configured to use static IP and not the auto DHCP.
1. Configure The Network Static IP in Primary Network Interface
Edit /etc/network/interfaces and adjust it
In this example setup we use the IP address 192.168.0.100
Also replace allow-hotplug eth0 with auto eth0 otherwise restarting the network doesn’t work, and we’d have to reboot the whole system.
vi /etc/network/interfaces
# This file describes the network interfaces available on your system # and how to activate them. For more information, see interfaces(5). # The loopback network interface auto lo iface lo inet loopback # The primary network interface #allow-hotplug eth0 #iface eth0 inet dhcp auto eth0 iface eth0 inet static address 192.168.0.100 netmask 255.255.255.0 network 192.168.0.0 broadcast 192.168.0.255 gateway 192.168.0.1 |
/etc/init.d/networking restart
edit /etc/hosts. Make it look like this:
vi /etc/hosts
127.0.0.1 localhost.localdomain localhost 192.168.0.100 Hughsblog.com server1 # The following lines are desirable for IPv6 capable hosts ::1 localhost ip6-localhost ip6-loopback ff02::1 ip6-allnodes ff02::2 ip6-allrouters |
echo server1.hughsblog.com > /etc/hostname
/etc/init.d/hostname.sh start
hostname
hostname -f
It is important that both show Hughsblog.com now!
2. Update Your Debian Installation
vi /etc/apt/sources.list
deb http://ftp.de.debian.org/debian/ wheezy main contrib non-free
deb-src http://ftp.de.debian.org/debian/ wheezy main contrib non-free

deb http://security.debian.org/ wheezy/updates main contrib non-free
deb-src http://security.debian.org/ wheezy/updates main contrib non-free

deb http://ftp.de.debian.org/debian/ wheezy-updates main contrib non-free
deb-src http://ftp.de.debian.org/debian/ wheezy-updates main contrib non-free
|
apt-get update
apt-get upgrade
3. Change The Default Shell
dpkg-reconfigure dash
Use dash as the default system shell (/bin/sh)? <- no
4. Synchronize the System Clock
apt-get install ntp ntpdate
5. Install Postfix, Dovecot, MySQL, phpMyAdmin, rkhunter, binutils
apt-get install postfix postfix-mysql postfix-doc mysql-client mysql-server openssl getmail4 rkhunter binutils dovecot-imapd dovecot-pop3d dovecot-mysql dovecot-sieve sudo
You will be asked the following questions:
General type of mail configuration: <– Internet Site
System mail name: <– Hughsblog.com
New password for the MySQL “root” user: <– yourrootsqlpassword
Repeat password for the MySQL “root” user: <– yourrootsqlpassword
vi /etc/postfix/master.cf
Uncomment the submission and smtps sections as follows (leave -o milter_macro_daemon_name=ORIGINATING as we don’t need it)
[...] submission inet n - - - - smtpd -o syslog_name=postfix/submission -o smtpd_tls_security_level=encrypt -o smtpd_sasl_auth_enable=yes -o smtpd_client_restrictions=permit_sasl_authenticated,reject # -o milter_macro_daemon_name=ORIGINATING smtps inet n - - - - smtpd -o syslog_name=postfix/smtps -o smtpd_tls_wrappermode=yes -o smtpd_sasl_auth_enable=yes -o smtpd_client_restrictions=permit_sasl_authenticated,reject # -o milter_macro_daemon_name=ORIGINATING [...] |
/etc/init.d/postfix restart
edit /etc/mysql/my.cnf and comment out the line bind-address = 127.0.0.1
vi /etc/mysql/my.cnf
[...] # Instead of skip-networking the default is now to listen only on # localhost which is more compatible and is not less secure. #bind-address = 127.0.0.1 [...] |
/etc/init.d/mysql restart
netstat -tap | grep mysql
The output should look like this:
root@server1:~# netstat -tap | grep mysql
tcp 0 0 *:mysql *:* LISTEN 26757/mysqld
root@server1:~#
6. Install Amavisd-new, SpamAssassin, And Clamav
apt-get install amavisd-new spamassassin clamav clamav-daemon zoo unzip bzip2 arj nomarch lzop cabextract apt-listchanges libnet-ldap-perl libauthen-sasl-perl clamav-docs daemon libio-string-perl libio-socket-ssl-perl libnet-ident-perl zip libnet-dns-perl
/etc/init.d/spamassassin stop
update-rc.d -f spamassassin remove
7. Install Apache2, PHP5, phpMyAdmin, FCGI, suExec, Pear, And mcrypt
apt-get install apache2 apache2.2-common apache2-doc apache2-mpm-prefork apache2-utils libexpat1 ssl-cert libapache2-mod-php5 php5 php5-common php5-gd php5-mysql php5-imap phpmyadmin php5-cli php5-cgi libapache2-mod-fcgid apache2-suexec php-pear php-auth php5-mcrypt mcrypt php5-imagick imagemagick libapache2-mod-suphp libruby libapache2-mod-ruby libapache2-mod-python php5-curl php5-intl php5-memcache php5-memcached php5-ming php5-ps php5-pspell php5-recode php5-snmp php5-sqlite php5-tidy php5-xmlrpc php5-xsl memcached
You will see the following question:
Web server to reconfigure automatically: <- apache2
Configure database for phpmyadmin with dbconfig-common? <- no
a2enmod suexec rewrite ssl actions include
a2enmod dav_fs dav auth_digest
vi /etc/apache2/mods-available/suphp.conf
comment out the <FilesMatch “\.ph(p3?|tml)$”> section and add the line AddType application/x-httpd-suphp .php .php3 .php4 .php5 .phtml – otherwise all PHP files will be run by SuPHP.
<IfModule mod_suphp.c>
    #<FilesMatch "\.ph(p3?|tml)$">
    #    SetHandler application/x-httpd-suphp
    #</FilesMatch>
        AddType application/x-httpd-suphp .php .php3 .php4 .php5 .phtml
        suPHP_AddHandler application/x-httpd-suphp

    <Directory />
        suPHP_Engine on
    </Directory>

    # By default, disable suPHP for debian packaged web applications as files
    # are owned by root and cannot be executed by suPHP because of min_uid.
    <Directory /usr/share>
        suPHP_Engine off
    </Directory>

# # Use a specific php config file (a dir which contains a php.ini file)
#       suPHP_ConfigPath /etc/php5/cgi/suphp/
# # Tells mod_suphp NOT to handle requests with the type <mime-type>.
#       suPHP_RemoveHandler <mime-type>
</IfModule>
|
/etc/init.d/apache2 restart
vi /etc/mime.types
[...] #application/x-ruby rb [...] |
/etc/init.d/apache2 restart
apt-get install php5-xcache
/etc/init.d/apache2 restart
apt-get install libapache2-mod-fastcgi php5-fpm
a2enmod actions fastcgi alias
/etc/init.d/apache2 restart
8. Install Mailman
apt-get install mailman
Languages to support: <– en (English)
Missing site list <– Ok
newlist mailman
root@server1:~# newlist mailman
Enter the email of the person running the list: <– admin email address, e.g. listadmin@example.com
Initial mailman password: <– admin password for the mailman list
To finish creating your mailing list, you must edit your /etc/aliases (or
equivalent) file by adding the following lines, and possibly running the
`newaliases’ program:
## mailman mailing list
mailman: “|/var/lib/mailman/mail/mailman post mailman”
mailman-admin: “|/var/lib/mailman/mail/mailman admin mailman”
mailman-bounces: “|/var/lib/mailman/mail/mailman bounces mailman”
mailman-confirm: “|/var/lib/mailman/mail/mailman confirm mailman”
mailman-join: “|/var/lib/mailman/mail/mailman join mailman”
mailman-leave: “|/var/lib/mailman/mail/mailman leave mailman”
mailman-owner: “|/var/lib/mailman/mail/mailman owner mailman”
mailman-request: “|/var/lib/mailman/mail/mailman request mailman”
mailman-subscribe: “|/var/lib/mailman/mail/mailman subscribe mailman”
mailman-unsubscribe: “|/var/lib/mailman/mail/mailman unsubscribe mailman”
Hit enter to notify mailman owner… <– ENTER
vi /etc/aliases
Add the following lines:
[...] ## mailman mailing list mailman: "|/var/lib/mailman/mail/mailman post mailman" mailman-admin: "|/var/lib/mailman/mail/mailman admin mailman" mailman-bounces: "|/var/lib/mailman/mail/mailman bounces mailman" mailman-confirm: "|/var/lib/mailman/mail/mailman confirm mailman" mailman-join: "|/var/lib/mailman/mail/mailman join mailman" mailman-leave: "|/var/lib/mailman/mail/mailman leave mailman" mailman-owner: "|/var/lib/mailman/mail/mailman owner mailman" mailman-request: "|/var/lib/mailman/mail/mailman request mailman" mailman-subscribe: "|/var/lib/mailman/mail/mailman subscribe mailman" mailman-unsubscribe: "|/var/lib/mailman/mail/mailman unsubscribe mailman |
newaliases
/etc/init.d/postfix restart
ln -s /etc/mailman/apache.conf /etc/apache2/conf.d/mailman.conf
This defines the alias /cgi-bin/mailman/ for all Apache vhosts, which means you can access the Mailman admin interface for a list at http:///cgi-bin/mailman/admin/, and the web page for users of a mailing list can be found at http:///cgi-bin/mailman/listinfo/.
Under http:///pipermail you can find the mailing list archives.
/etc/init.d/apache2 restart
/etc/init.d/mailman start
9. Install PureFTPd And Quota
apt-get install pure-ftpd-common pure-ftpd-mysql quota quotatool
vi /etc/default/pure-ftpd-common
make sure that the start mode is set to standalone and set VIRTUALCHROOT=true
[...] STANDALONE_OR_INETD=standalone [...] VIRTUALCHROOT=true [...] |
echo 1 > /etc/pure-ftpd/conf/TLS
mkdir -p /etc/ssl/private/
openssl req -x509 -nodes -days 7300 -newkey rsa:2048 -keyout /etc/ssl/private/pure-ftpd.pem -out /etc/ssl/private/pure-ftpd.pem
Country Name (2 letter code) [US]: <– Enter your Country Name (e.g., “US”).
State or Province Name (full name) [Some-State]: <– Enter your State or Province Name.
Locality Name (eg, city) []: <– Enter your City.
Organization Name (eg, company) [Camelot Ltd]: <– Enter your Organization Name (e.g., the name of your company).
Organizational Unit Name (eg, section) []: <– Enter your Organizational Unit Name (e.g. “IT Department”).
Common Name (eg, YOUR name) []: <– Enter the Fully Qualified Domain Name of the system (e.g. “Hughsblog.com”).
Email Address []: <– Enter your Email Address.
chmod 600 /etc/ssl/private/pure-ftpd.pem
/etc/init.d/pure-ftpd-mysql restart
Edit /etc/fstab. Mine looks like this (I added ,usrjquota=quota.user,grpjquota=quota.group,jqfmt=vfsv0 to the partition with the mount point /)
vi /etc/fstab
# /etc/fstab: static file system information. # # Use 'blkid' to print the universally unique identifier for a # device; this may be used with UUID= as a more robust way to name devices # that works even if disks are added and removed. See fstab(5). # # /dev/mapper/server1-root / ext4 errors=remount-ro,usrjquota=quota.user,grpjquota=quota.group,jqfmt=vfsv0 0 1 # /boot was on /dev/sda1 during installation UUID=46d1bd79-d761-4b23-80b8-ad20cb18e049 /boot ext2 defaults 0 2 /dev/mapper/server1-swap_1 none swap sw 0 0 /dev/sr0 /media/cdrom0 udf,iso9660 user,noauto 0 0 |
mount -o remount /
quotacheck -avugm
quotaon -avug
10. Install BIND DNS Server
apt-get install bind9 dnsutils
11. Install Vlogger, Webalizer, And AWstats
apt-get install vlogger webalizer awstats geoip-database libclass-dbi-mysql-perl
vi /etc/cron.d/awstats
#MAILTO=root #*/10 * * * * www-data [ -x /usr/share/awstats/tools/update.sh ] && /usr/share/awstats/tools/update.sh # Generate static reports: #10 03 * * * www-data [ -x /usr/share/awstats/tools/buildstatic.sh ] && /usr/share/awstats/tools/buildstatic.sh |
12. Install Jailkit
apt-get install build-essential autoconf automake1.9 libtool flex bison debhelper binutils-gold
cd /tmp
wget http://olivier.sessink.nl/jailkit/jailkit-2.17.tar.gz
tar xvfz jailkit-2.17.tar.gz
cd jailkit-2.17
./debian/rules binary
cd ..
dpkg -i jailkit_2.17-1_*.deb
rm -rf jailkit-2.17*
13. Install fail2ban
apt-get install fail2ban
vi /etc/fail2ban/jail.local
[pureftpd]
enabled  = true
port     = ftp
filter   = pureftpd
logpath  = /var/log/syslog
maxretry = 3

[dovecot-pop3imap]
enabled = true
filter = dovecot-pop3imap
action = iptables-multiport[name=dovecot-pop3imap, port="pop3,pop3s,imap,imaps", protocol=tcp]
logpath = /var/log/mail.log
maxretry = 5

[sasl]
enabled  = true
port     = smtp
filter   = sasl
logpath  = /var/log/mail.log
maxretry = 3
vi /etc/fail2ban/filter.d/pureftpd.conf
[Definition]
failregex = .*pure-ftpd: \(.*@<HOST>\) \[WARNING\] Authentication failed for user.*
ignoreregex =
vi /etc/fail2ban/filter.d/dovecot-pop3imap.conf
[Definition]
failregex = (?: pop3-login|imap-login): .*(?:Authentication failure|Aborted login \(auth failed|Aborted login \(tried to use disabled|Disconnected \(auth failed|Aborted login \(\d+ authentication attempts).*rip=(?P<host>\S*),.*
ignoreregex =
/etc/init.d/fail2ban restart
13. Install SquirrelMail
apt-get install squirrelmail
squirrelmail-configure
<– D
<– dovecot
<– press a key
<– S
<– Q
cd /etc/apache2/conf.d/
ln -s ../../squirrelmail/apache.conf squirrelmail.conf
/etc/init.d/apache2 reload
vi /etc/apache2/conf.d/squirrelmail.conf
[…]
<Directory /usr/share/squirrelmail>
Options FollowSymLinks
<IfModule mod_php5.c>
AddType application/x-httpd-php .php
php_flag magic_quotes_gpc Off
php_flag track_vars On
php_admin_flag allow_url_fopen Off
php_value include_path .
php_admin_value upload_tmp_dir /var/lib/squirrelmail/tmp
php_admin_value open_basedir /usr/share/squirrelmail:/etc/squirrelmail:/var/lib/squirrelmail:/etc/hostname:/etc/mailname
php_flag register_globals off
</IfModule>
<IfModule mod_dir.c>
DirectoryIndex index.php
</IfModule>
# access to configtest is limited by default to prevent information leak
<Files configtest.php>
order deny,allow
deny from all
allow from 127.0.0.1
</Files>
</Directory>
[…]
mkdir /var/lib/squirrelmail/tmp
chown www-data /var/lib/squirrelmail/tmp
/etc/init.d/apache2 reload
You can now access SquirrelMail from your web site as follows:
http://192.168.0.100/squirrelmail
http://www.example.com/squirrelmail
You can also access it from the ISPConfig control panel vhost (after you have installed ISPConfig, see the next chapter) as follows (this doesn’t need any configuration in ISPConfig):
http://server1.example.com:8080/squirrelmail
vi /etc/apache2/conf.d/squirrelmail.conf
[...]
<VirtualHost *:80>
  DocumentRoot /usr/share/squirrelmail
  ServerName webmail.Hughsblog.com
</VirtualHost>
|
you can access SquirrelMail under http://webmail.hughsblog.com!
14. Install ISPConfig 3
cd /tmp
wget http://www.ispconfig.org/downloads/ISPConfig-3-stable.tar.gz
tar xfz ISPConfig-3-stable.tar.gz
cd ispconfig3_install/install/
php -q install.php
<– ENTER
<– ENTER
<– ENTER
<– ENTER
<– ENTER
<– yourrootsqlpassword
<– ENTER
<– ENTER
<– ENTER
<– ENTER
<– ENTER
<– ENTER
<– ENTER
<– ENTER
<– ENTER
<– ENTER
<– ENTER
<– ENTER
<– ENTER
<– ENTER
<– ENTER
The installer automatically configures all underlying services, so no manual configuration is needed.
You now also have the possibility to let the installer create an SSL vhost for the ISPConfig control panel, so that ISPConfig can be accessed usinghttps:// instead of http://. To achieve this, just press ENTER when you see this question:
Do you want a secure (SSL) connection to the ISPConfig web interface (y,n) [y]: <– ENTER
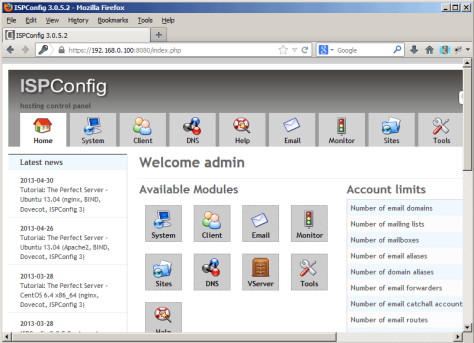
Afterwards you can access ISPConfig 3 under http(s)://server1.Hughsblog.com:8080/ or http(s)://192.168.0.100:8080/
Log in with the username admin and the password admin (you should change the default password after your first login).
Install Word Press
su –
apt-get install apache2 mysql-client mysql-server php5 php5-mysql php5-curl php5-gd
mysql -u root -p
CREATE DATABASE wpdatabase;
CREATE USER wpuser@localhost IDENTIFIED BY ‘wppass’;
GRANT ALL PRIVILEGES ON wpdatabase.* TO wpuser@localhost;
FLUSH PRIVILEGES;
exit
service apache2 restart
service mysql restart
cd /tmp
wget -c http://wordpress.org/latest.zip
unzip -q latest.zip -d /var/www/html/
chown -R www-data.www-data /var/www/html/wordpress
chmod -R 755 /var/www/html/wordpress
mkdir -p /var/www/html/wordpress/wp-content/uploads
chown -R www-data.www-data /var/www/html/wordpress/wp-content/uploads
cd /var/www/html/wordpress/
cp wp-config-sample.php wp-config.php
gedit wp-config.php
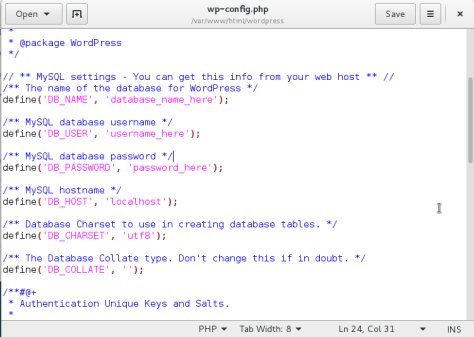
Then enter the database name, database user and password you have created earlier:
Save your file and exit. Finally open your browser and type this link to complete the installation of WordPress:
Disourse Installation
wget -qO - https://deb.packager.io/key | sudo apt-key add -
echo "deb https://deb.packager.io/gh/pkgr/discourse wheezy pkgr" | sudo tee /etc/apt/sources.list.d/discourse.list
sudo apt-get update
sudo apt-get install discourse
Create a new postgres user:
echo "CREATE USER \"user\" SUPERUSER PASSWORD 'pass';" | su - postgres -c psql && \ echo "CREATE DATABASE discourse;" | su - postgres -c psql && \ echo "GRANT ALL PRIVILEGES ON DATABASE \"discourse\" TO \"user\";" | su - postgres -c psql
Set the various environment variables:
discourse config:set DATABASE_URL=postgres://user:pass@127.0.0.1/discourse
discourse config:set REDIS_URL=redis://127.0.0.1:6379
discourse config:set SECRET_TOKEN=$(discourse run rake secret)
# set this to the main admin email address
discourse config:set DISCOURSE_DEVELOPER_EMAILS="someone@example.com"
# set this to your server FQDN
discourse config:set DISCOURSE_HOSTNAME=discourse.example.com
discourse run rake db:migrate db:seed_fu
discourse scale web=1 worker=1sudo apt-get install -y nginx
# setup nginx configuration
cat > /etc/nginx/sites-available/default <<EOF
server {
listen 80;
server_name $(discourse config:get DISCOURSE_HOSTNAME);
location / {
proxy_pass http://localhost:6000;
}
}
EOF
# restart nginx
sudo service nginx restart
apt-get install postfix
discourse config:set DISCOURSE_SMTP_ADDRESS="smtp.mandrillapp.com"
discourse config:set DISCOURSE_SMTP_PORT="587"
discourse config:set DISCOURSE_SMTP_USER_NAME="someone@example.com"
discourse config:set DISCOURSE_SMTP_PASSWORD="API_KEY"
sudo service discourse restart
apt-get update
apt-get install discourse
discourse run rake db:migrate
Available commands:
discourse logs # see all logs
discourse run console # run a Rails console
discourse config # inspect the environment variables used to configure discourse
service discourse start/stop/restart/status
